Cleaning ventilation filters can remove loose surface dust between replacements, but it does not restore a worn or heavily loaded filter to its original performance. Most residential MVHR (heat-recovery ventilation) filters are consumables. Clean them only if the unit manufacturer’s instructions allow it; wash them only if they are explicitly described as washable. This guide explains when to inspect, clean or replace the filters and how to select a compatible replacement.
Quick answer
- Inspect regularly: around every three months is a useful general reference, not a universal maintenance schedule.
- Replace when needed: many technical guides suggest roughly every 6–12 months, but follow the appliance manual, filter condition and any service indication.
- Do not wash disposable filters: water and inappropriate cleaning can damage the filtering medium or leave it damp.
- Switch the unit off safely: isolate its power before opening the maintenance compartment, as instructed by the manufacturer.
Can an MVHR filter be cleaned instead of replaced?
First identify the filter and read your unit manual. Synthetic pleated and panel filters used in residential ventilation are usually intended to be replaced. Some equipment uses washable prefilters, but a filter that fits the same slot is not necessarily washable. A light surface layer of dust may be removable with gentle vacuuming only if permitted; particles embedded deeper in the material remain.
| Condition | Practical action |
|---|
| Dry and intact, light surface dust | Careful dry cleaning if permitted by the manual |
| Dark, compacted or heavily loaded filter | Replace |
| Torn medium, distorted frame or damaged seals | Replace without delay |
| Damp material, mould-like staining or a musty odour | Replace and investigate the cause of moisture |
| Filter expressly identified as washable | Follow the specified washing method and allow complete drying |
| Manual’s replacement interval or filter alarm reached | Follow the unit-specific instructions |
Neither the colour of the filter nor a visibly cleaner surface demonstrates that its filtration efficiency has been restored.
Why clogged filters matter
As dust accumulates, the filter’s resistance to airflow (pressure drop) generally increases. Depending on the system’s controls, that can reduce airflow, increase fan energy use or raise noise levels. Bypass leakage around a poorly seated or clogged filter can also allow unfiltered air to enter. According to Caleffi’s technical guide to ventilation maintenance, filter care also helps limit deposits in the heat exchanger and ductwork.
How often should filters be checked and changed?
Caleffi gives a general example of cleaning or checking about every three months and replacing filters after approximately six to twelve months. Treat those figures as a starting point only. Busy roads, construction dust, seasonal pollen, long operating hours and renovation work can all affect loading. Your specific appliance’s instructions and any filter-change indication take priority.
Some units issue a reminder based on time; others monitor pressure drop. These are different methods, so a warning does not always mean that a sensor measured the filter’s exact condition. If airflow remains poor after fitting new filters, the unit may need professional inspection.
Step-by-step cleaning, when permitted
- Check the unit manual. Confirm the allowed maintenance method and replacement interval.
- Isolate electrical power as the manufacturer instructs before opening any service panel.
- Open the filter compartment without forcing clips, hinges or seals.
- Record the original positions. Photograph each filter and any supply/extract or airflow-arrow markings before removal.
- Inspect the medium and frame. Replace filters with damage, moisture or heavy contamination instead of trying to clean them.
- If dry cleaning is allowed, gently remove loose dust using low suction without pressing a hard nozzle into the medium. Do not use high-pressure compressed air.
- Wash only manufacturer-approved washable filters. Follow the specified method and let them dry completely before refitting.
- Clean the accessible compartment without wetting electrical parts or disturbing sensitive equipment.
- Refit in the correct position and direction, close the unit, restore power and reset the service reminder according to the manual.
Mistakes worth avoiding
- Washing a disposable F7/ePM1 or other filter without the manufacturer’s permission.
- Using harsh brushes, aggressive cleaners or compressed air that could damage the medium.
- Operating the ventilation unit with filters removed.
- Interchanging supply and extract filters just because their dimensions look similar.
- Assuming repeated vacuuming can replace scheduled filter changes.
When to call a technician
Users can usually inspect and replace accessible filters following their own unit’s manual. Deep cleaning of fans, heat exchangers and air ducts, unexplained odours, persistent airflow problems and electrical faults should be handled by suitably qualified professionals. Do not dismantle internal equipment solely to access a filter.
Choosing the correct replacement filter
Identify the full ventilation-unit model and version, measure the filter’s length, width and thickness in millimetres, and check the specified filter class and airflow direction. Check the frame and gasket arrangement as well as the nominal size. Even small differences may affect fit and sealing.
Older labels such as G4, M5 and F7 refer to the previous EN 779 classification; ISO 16890 uses groups such as ISO Coarse, ePM10 and ePM1 with stated efficiencies. They are not universally interchangeable: refer to the tested specification of the actual product. If you are considering a finer supply-air filter such as F7/ePM1, verify that your unit supports the resulting airflow resistance.
For the classification itself, see our ISO 16890 guide.
Examples of compatible replacement sets
These are different models, with different dimensions and filtration combinations. Check the exact model and the currently available pack option on each product page; none is a universal replacement.
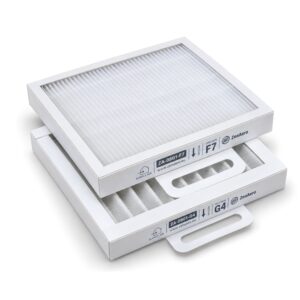
Two-filter set, 185 × 168 × 25 mm. Compatible with the listed Smarty 2XP versions.
Check pack options →
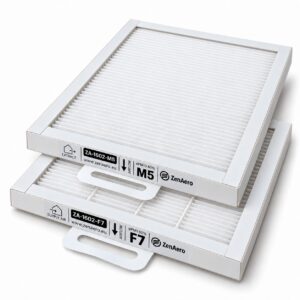
Two-filter set, 250 × 183 × 21 mm. Only selected pack sizes currently have stock.
Check pack options →
Find the right filter for your ventilation unit
Browse the ZenAero replacement-filter catalogue by ventilation-unit brand and model. Compatible filters are not original equipment-manufacturer parts. Verify dimensions, filter class and pack size before ordering.
Frequently asked questions
Can I wash an MVHR filter with water?
Only when the filter manufacturer or your ventilation-unit manual explicitly permits washing. Most disposable pleated filters should be replaced instead.
Is gentle vacuuming enough?
It may remove loose surface dust where allowed, but cannot be relied upon to remove fine particles held inside the medium or to restore a loaded filter’s original characteristics.
Should I replace filters every three months?
Three months is a useful inspection reference, not a universal replacement interval. Follow the equipment manual and actual conditions.
Can I fit a finer filter?
Not automatically. Confirm the unit’s requirements, installation position and pressure-drop implications first.
Sources
Manufacturer trademarks are used only to identify equipment compatibility. ZenAero compatible replacement filters are not original parts made or approved by the equipment manufacturers.
Why choose ZenAero
Checkable compatibility
Full model names and stated dimensions help you choose the correct replacement.
Clear filter classes
Read the individual product’s ISO class and choose the configuration specified for your unit.
Filtration and airflow
Filter media and construction matter alongside class: compare the set specifications.
Sets and help choosing
Compare the available packs. If unsure, identify the brand, model and dimensions before ordering.